
Contacts
Your account's address book: add, import and organize the people you send campaigns to.
Contacts is your account’s address book: the people you can send campaigns to, with their contact details, language, tags and marketing consent.
You can open it from the side menu, in the Customers section, or at:
https://app.bookline.ai/contacts
The contact list
Section titled “The contact list”
Each row shows:
- Name, with the phone number below it (or, if there isn’t one, their Instagram or WhatsApp username). If the contact has unsubscribed from marketing on any channel, an Opt-out badge appears.
- Language
- Tags
The list shows 10 contacts per page. At the top you have:
- Quick search: by name, email, phone or Instagram or WhatsApp username.
- Filter: Con teléfono, Con email, Marketing opt-out in (WhatsApp, Email or SMS), Language and Tags. Clean filters removes them.
- Import, Export and Add.
Each row has shortcuts to Open WhatsApp, Send email, Call and Delete. Click the row to open the contact’s page.
If you tick several boxes, a bar appears with Delete and Tags so you can act on all of them at once.
On mobile you have search, filters and the add button; Import and Export are only available on a computer.
Export
Section titled “Export”Export downloads a CSV with the contacts you’ve selected or, if you don’t select any, with all of them. It includes name, phone, email, Instagram, WhatsApp, language and tags.
Add a contact
Section titled “Add a contact”Click Add to open Add contact:
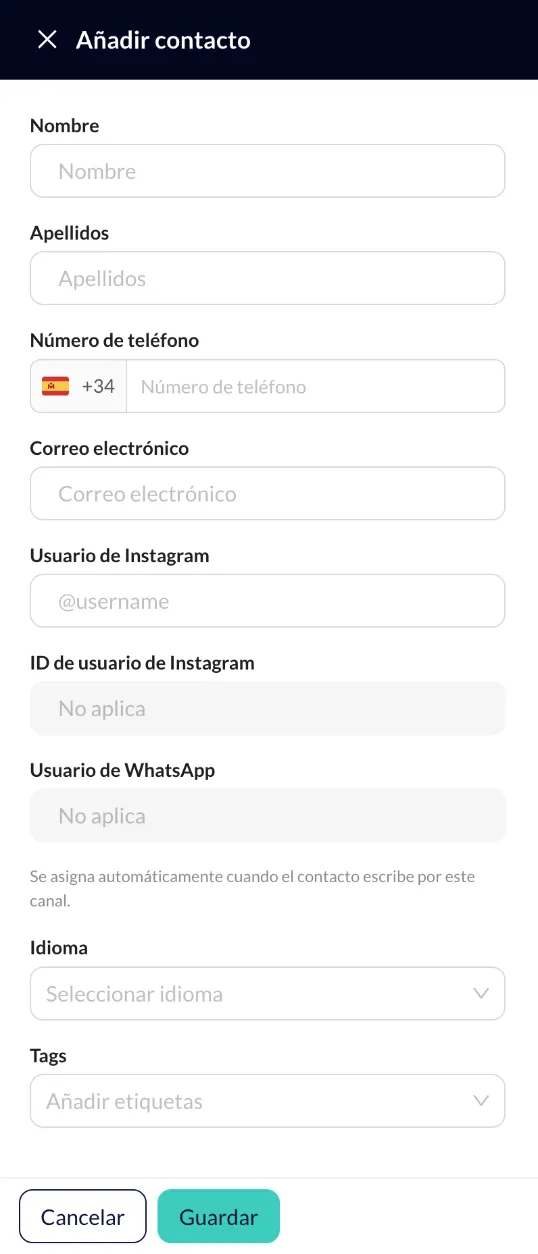
- Name and Surnames
- Phone number
- Instagram username
- Language
- Tags
You need at least a phone number, an email or an Instagram or WhatsApp identifier. Two contacts can’t have the same phone number or email.
When the contact messages you on Instagram or WhatsApp, Bookline automatically saves their Instagram user ID and WhatsApp username; you can’t edit them.
Marketing consent
Section titled “Marketing consent”When you edit an existing contact, the Marketing consent section shows which channels (WhatsApp, Email, SMS) they agree to receive campaigns on. A contact without consent on a channel is left out of campaigns on that channel. Save your changes with the Save button.
The Consent history shows when they opted in or out and from where (Campaign or Portal). When someone replies to a campaign to unsubscribe, it’s recorded here.
Import contacts
Section titled “Import contacts”Click Import and upload a .csv, .xlsx or .xls file.
- Upload the file.
- Match the columns to Bookline’s fields: Name, Surnames, Phone number, Email, Language and Tags. Bookline detects many headers automatically. You must map at least the phone or email column. You can add tags that will be applied to all imported contacts, and you see a preview of the first rows.
- Import. When it finishes, you see how many contacts were imported, how many duplicate rows were skipped (by phone number) and which ones failed and why. You can Download invalid contacts (CSV), fix them and import them again.
A contact’s page
Section titled “A contact’s page”It shows the contact details, the channels where they’ve unsubscribed from marketing, and a summary: Calls, Conversations, Bookings, Cancelled, First interaction and Last interaction. Below, a timeline with the filters All, Calls, Conversations, Bookings and Notifications. Edit opens the form.
Tags and segments
Section titled “Tags and segments”Tags are free text: you type them when you add or edit a contact, when you import, or in bulk with Tags on several selected contacts. You use them to choose a campaign’s audience.
Segments (groups defined by how customers have interacted with your assistants) are created and managed from the Campaigns wizard.